Basic Structure of a Mod in Arma 3

Welcome to the first Arma 3 Series tutorial blog. In this case, we will make our own basic mod. On this tutorial, I will guide you through. All the steps and tools needed for creating our first mod in Arma 3.
IMPORTANT! Keep in mind that this tutorial is a guide for creating basic add-ons that will only change basic parts of the game. This is not an advanced tutorial. We will approach the tutorial from the most basic side of creating an Arma 3 add-on or mod.
At the end of this post, I will leave a list of useful websites for learning about Arma 3 Modding and Add-on creation.
Before starting to do something is important to have all our tools setup and ready to go, here you will find a selection of tools we will be using during the Arma 3 tutorials:
- Arma 3 Tools (Add-on Building, Tex2View, Arma 3 Publisher, etc.) from Steam.
- PBO Manager from Armaholic.
- Text/Code Editor: VS Code. You can use your preferred text/code editor, my personal recommendation is VS Code, but that's your preference. Other options: (Notepad++, Atom or Sublime Text, etc.).
Basic Folder Structure for our Add-on
When developing our Add-on, we will have to create a folder structure like shown in the picture below:
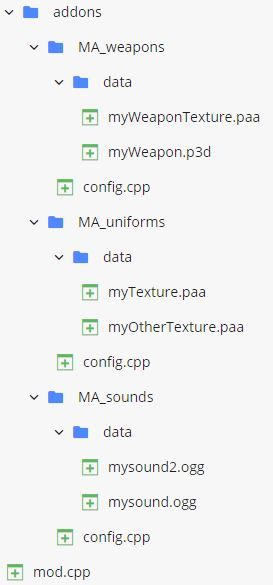
Let's analyze that structure folder-by-folder, file-by-file. The first thing we find is our addons folder with its name. This will be the name of the addon, it is not necessary to name it with the full name, but I will recommend you to name all your folders with no spaces and special characters.
Inside this first folder we will have a couple of files and one folder. Let's create those:
mod.cpp
addons
That folder will contain all of our .pbo files. Now we have reached this point, let me explain to you what is a .pbo.
A .pbo is a compressed folder where all our content will be saved (scripts, images, audios, etc.). Each folder we create, inside the addons folder, will be a separate .pbo. This is done, mainly, for two reasons:
- Organize our assets on small packages with a logical distribution.
- Reduce the size of the package.
NOTE: 2GB is the limit for a single .pbo file.
Later on, in future posts, we will learn how to convert our folders on those .pbo files. For now, let's continue with the addons folder content.
The game does only look for the .pbo files, so all the references and content we create will be inside those. It is a good practice to name each folder with a prefix (On this example will be "MA_" as "My Addon"). This way is easier to identify our .pbo folders from other addons, and we reduce the chance of naming our .pbo as other developer did in his packages.
The structure of the folders inside addons is up to you, and your way of organizing your content logically. You can pack all your content in one unique folder or create one for each type of object (Example: one folder for my uniforms, other for the weapons and other for my vehicles.)
Inside each folder, by general rule, we will have to create one config.cpp file. And one folder data for saving our textures, 3D Models, sounds, etc. Inside de data folder, you can create as many folders as you want to organize everything.
config.cpp
The config.cpp will have all the code necessary to add our objects, textures, sounds and whatever we want to add or modify In-Game.
Those are the basics for creating an addon on Arma 3, on a future post, we will be learning the code needed on the config.cpp for adding different types of things to our addon.
For more complex addons, ACE3 Team, has >created an open and more complex template you can use for free. This template can be found on their github page. https://github.com/acemod/arma-project-template and will help you using their framework.
All the tutorials related with Arma 3 can be found on the Arma 3 Category of this blog.
Useful websites for Modding
- Arma 3 Wiki
- Arma 3 Official Forums
- Arma 3 Licenses
- ArmaHolic forums
- Killzone_kid's Blog
- Kylania ArmAScript Examples
If you did find any other source useful, share them on the comments and will try to add those on the list ;)