First Steps: Installing Raspbian


In previous post we analyze the different components we needed to keep in mind while buying a Raspberry Pi, in case you haven't read it yet, or you want to check it again, you can do so, here: /2015/12/29/things-you-need-to-know-before-buying-a-raspberry-pi/
In this new post we are going to follow the firsts steps for installing and configuring the operating system, in this case: Raspbian, any other will follow the same steps.
Tools we are going to need:
Win32DiskImager: This software will allow us to mount the image of the operating system on our microSD. Some steps later, we will use it also for another propose. We can download it from SourceForge: https://sourceforge.net/projects/win32diskimager/
MicroSD card adapter: We will need an adapter to connect the microSD card to the computer.
Raspbian Installation
First step: Download
Once we have both tools, we will download a copy of the operating system, in our case: Raspbian. This one can be downloaded from its Official Page in the Download section. Taking today as reference, the last version is: "Raspbian Jessie", we will take that: https://www.raspberrypi.org/downloads/raspbian/
Second step: Mount
Next step is to open Win32DiskImager, from once side, we will select the .IMG of the Operating System we downloaded, from the other side, we must select the device we want to mount the OS on: the microSD.
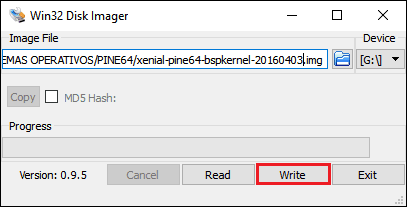
Click on write and wait until the progress bar finishes. Once it's done, the program will open a popup window, saying it's finished. Then we can safely eject the microSD from the computer. On this step, we will have everything prepared and ready to install.
Third Step: Installation
Before turning on the Raspberry Pi, it's recommendable to connect everything first: keyboard, mouse and the microSD card we prepared on the previous step. It is recommendable to also connect it to internet, through Ethernet cable or Wi-Fi adapter (USB). For now, will use the monitor to see what's going on, so use the raspberry's HDMI output, and connect it to a TV or monitor.
Once everything is connected and prepared, it's time to power it on. Connect the USB/micro USB cable to the power adapter. As soon as we connect it on, the raspi will start installing and booting the operating system. In the top left corner will be the 4 icons of raspberry, and many lines of text showing the process and the state of it. Hopefully all will be marked as: [OK], in that case, the OS is correctly installed.
At that point, we will be able to see the Desktop.
Fourth Step: Configuration
In case the configuration has not been opened, we can open it typing on the terminal, the following command:
sudo raspi-config
You will see something like this:

The first thing we must do is to Expand the File system, for that we must hit enter on option 1, and confirm the operation. The change will not be applied until we reboot, Raspberry will give that option.
This window will allow us to change the default password:
user: pi
password: raspberry
Overclock is also available here, and some advanced options that on our case won't need.
To exit the menu, just select Finish and hit Enter. Remember to reboot if you have done it yet. You can do so typing on terminal:
sudo reboot
Fifth step: Updating
Congratulations, at this point you have successfully installed and made a basic configuration of the OS. On this step, we will update the operating system to it's latest update. We type the following commands:
sudo apt-get update
sudo apt-get upgrade
sudo rpi-update
Sixth step: Backup
Last but not least, we are going to make a backup. At this point we have the OS correctly installed and updated even, with a basic configuration. This takes time to be done, so just in case we lose our data or the SD becomes corrupted, is important to be able to have a copy with our settings and updates. For this power off the Raspberry:
sudo shutdown -h now
After the lights stops blinking, extract the SD. And we start making the backup.
To do so, we are going to use Win32DiskImager again, but in this case the opposite operation: generate an image of the configured OS. For that, we must select the** path and name** we want to use for saving the backup, in my case: "C:\Users\PcCom\Documents\2_BACKUPS\backup-SO-Updated.img". And we select the device we want to back up.
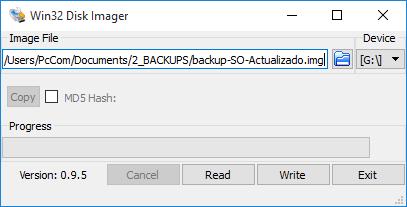
In this case, we must click **Read, **once is finished, just close, eject it on a safe way and power the system again with the SD inside the Raspberry.
DONE!! You have installed, configured, updated and made a backup of the operating system successfully. You are ready to start any project you want.
See you on the next!